Saturday, August 1, 2009

Circles Invitation and template

As promised, I’m sharing the invites I designed for MOH-Ho’s wedding. I worked really hard on making these efficient (the set is printed on a single sheet of 8.5×11 cardstock). While I thoroughly enjoy receiving a pretty invite, I also feel terrible when I throw out fancy sets that include so much material. So, I was thrilled that MOH-Ho and her parents appreciated the compactness as much as I did!

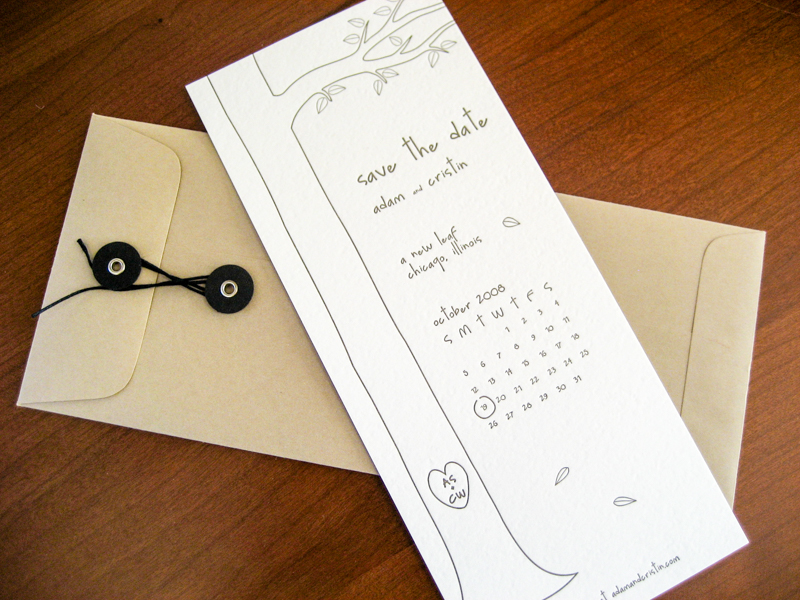
Here’s the whole suite:


Instead of an inner envelope, I added matching circles with first names of guests to top the suite that is tied together by a cotton string:

A closer look at the directions/website card and the RSVP postcard:

Back of envelope and back of postcard:

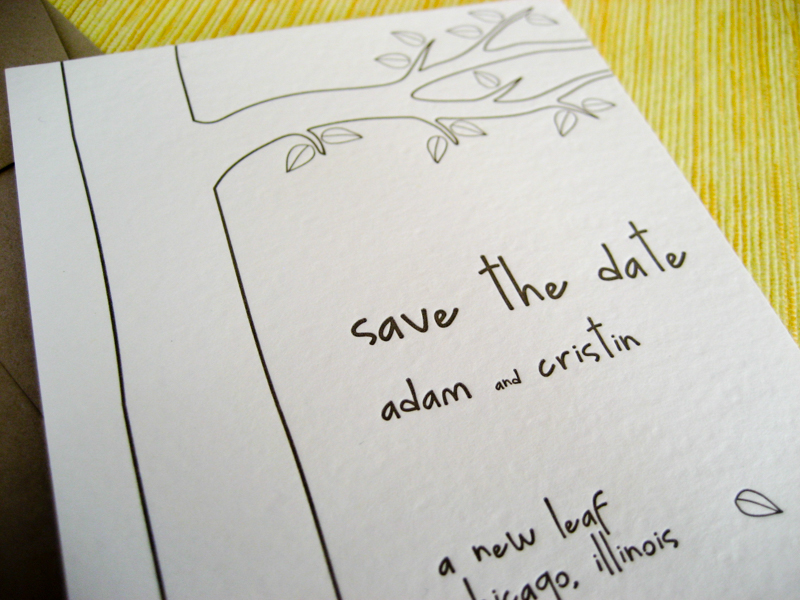
The texture and color of the paper added the perfect touch! :)

Cost Breakdown for 100 invites:

Purple Metallic Envelopes (100): $24
Gold Linen Metallic Cardstock (100): $28
String from craft store: $2
Tax & Shipping: $8
Home printing cost not included, since I have no way to estimate it, and it would vary depending on your printer

Cost per invite suite: $0.62

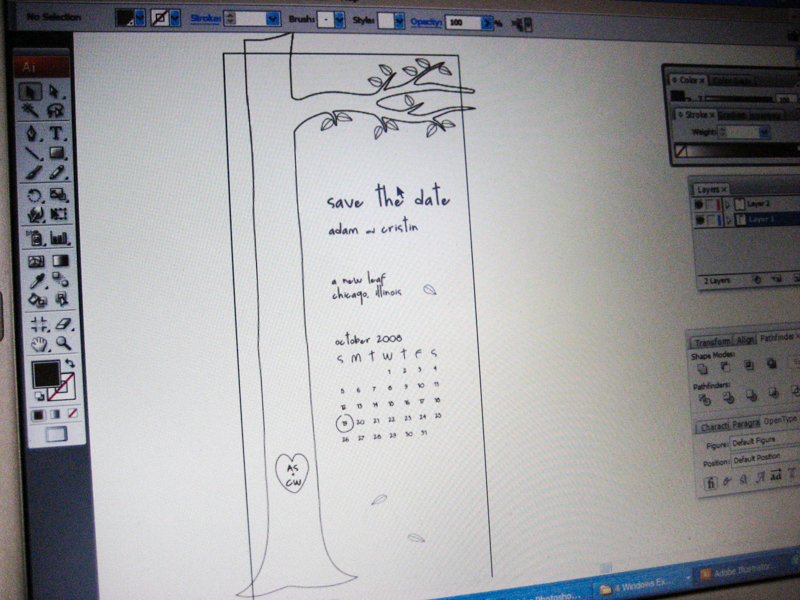
Below is the template set for this invite suite, free for you to download:


CLICK HERE TO DOWNLOAD TEMPLATE PART 1 (PDF)

CLICK HERE TO DOWNLOAD TEMPLATE PART 2 (MS WORD)

Instructions:

  1. Download both templates
  2. Personalize text (change wording, color, font, sizes to suit your needs) in the Word document
  3. Print both templates on the same piece of atest sheet (be sure to recycle scratch paper if you have some around!)
  4. Modify text format and move text boxes as appropriate, then repeat step 3&4 on snew test sheet until satisfactory
  5. Print on paper of your choice (see my recommendations in post)
  6. Cut and assemble

Notes:

  • Included are 3 cards, 1 label, 2 name tags
  • 3 cards are identically sized, everything fits in a 4 bar envelope ( 3 5/8″x 5 1/8″)
  • Postcard is slightly smaller than USPS standard (our local post office says they can still be mailed, just with a little more postage)
  • The sample pic shown includes the Birch Std font
  • Actual colors vary, depending on your printer

Enjoy!

Giving Tree STD

Merriment :: Giving Tree Save the Date Wedding Announcements for Fall

How sweetly romantic is this save the date wedding announcement for Cristin Witcher and her fiance Adam Siegel’s fall Chicago nuptials?

Adam designed the whimsically simple letterpressed announcement and matching tree branch mailing labels using The Giving Tree as his inspiration, a book that has special meaning to the couple. Their wedding website URL at the bottom of the card provides guests useful information about hotels, logistics and registry.

I love that the concept is so versatile. Use it for summer and spring weddings and showers by coloring the mailing label and invitation leaves in shades of green. Change the text for a children’s birthday party invitation with an eco-friendly theme.

Cristin and Adam have graciously shared their tree template here at Merriment for free with the request that anyone using the template post a comment below or email me to track its usage.

Supplies:

Merriment :: Giving Tree Save the Date Wedding Announcements for Fall

Download Cristin and Adam’s free template. Open in Adobe Illustrator to edit the file (if you don’t have Illustrator and need help please email me or post a comment below).

Cristin and Adam had their announcements letterpressed. If printing yourself, adjust the file to print multiple announcements onto 8 1/2″ x 11″ paper and trim to size using your paper trimmer. Place in envelopes and seal.

Enter guest names into the Word document template and print in color on the Avery labels. Cristin says this was the hardest part of the whole deal. You’ll want to buy some extra labels to give yourself wiggle room to ensure it lines up cleanly. Cut labels on lines using your paper trimmer.

Be sure to dress it up by creating personalized postage at PhotoStamps.com. Custom stamps make a big difference so ask me questions if you need help.

Cristin and Adam are getting married the same weekend where Shane and I did at A New Leaf. They’re in for a treat. It’s a great space, especially in the fall. Congratulations, Cristin and Adam, and many thanks to you both!

Merriment :: Giving Tree Save the Date Wedding Announcements for Fall

COPYRIGHT NOTE: You’re more than welcome to use this project and pattern for your own personal use. Please post a comment below or email me if you use the template so that Cristin and Adam can track its use. Like this free project? See more in our weddings category.

diy feather and crystal bouquet

DIY Wedding Challenge: My DIY bouquet with feathers and beads article photo

Like most of the brides in this economy I couldn't afford a $200+ bouquet so I decided to try my hand at making my own bouquet. I decided to do a trial run before actually making the real bouquet for my wedding day. With a little bit of patience and lots of excitment you can create your perfect bouquet. It's extra special because I know it's exactly what I want and I saved some money along the way.

Materials:

  • Half a dozen of roses of your choice. I used pink and red intuition roses for texture and dark red roses for color contrast.
  • Half a dozen of red and pink gerbera daisies.
  • One string of red feathers I purchased from TonyHill.net
  • One string of burgandy eyelash feather
  • 30 sprays of beads
  • Dark red ribbon to cover the stem
  • Tassels for decoration
  • Some floral wire and rubber bands
  • Floral tape from Hoby Lobby
  • Floral pin without pearl head from Hobby Lobby

Tools:

  • Scissor to cut flowers
  • Wire cutter for the bead stray

Assembly:

Take one rose and put three spray around it and then bind them together using floral tape. Do this for about 3 flowers. When you're done hold the three flowers together and make sure the heads are level and they don't stick up. This is the core of the bouquet. Use floral tape to bind them togehter so it's easier for you to hold. Now you can add bead sprays and flowers as you go. I add 2-3 sprays for each flower. Don't worry about the spray running in each other since it's wire you can adjust them afterward. I added each flower around the core and keep going in a circle. Till the bouquet toward you to make sure it's a dome shape, pull the stem a bit lower to make sure that the flowers around the core is a bit lower. Keep adding flowers in a circle around the core until you're happy with the size.

Once I'm happy with it, I used floral tape to go around the top of the bouquet making sure it's secure. I only did the top and then i used rubber band to secure the stems. I used one near the head of the bouquet, one 3 inch down and one at the end about 7 inch from the flower head.

Now you can hold the bouquet up and cut the stems so it's shorter. Depending how big your hands are you can cut accordingly so it's comfortable for you to hold your bouquet. I left 2-3 inches longer since I will be storing the bouquet for the next day. This way you can submerge your bouquet in water without wetting your ribbon and cut the stem before you use your bouquet.

I use floral tape to tape around the stems creating my bouquet's handle. Floral tape will create a stickiness that will help you wrap the ribbon around easier and secure your bouquet.

Now I add the feathers. My feather came in a string so I pin one end of the string to the stem and then rotate my bouquet and keep pinning the string to my bouqet. Go around in a circle and it will create a nice look from the top of your bouquet. I added the eyelash feather first and then the red feathers.

Once I'm done with the feathers I used a red damask red ribbon to wrap the steam hidding the floral tape and the bottom of the feathers. I started from the top and pin my ribbon to the handle of my bouqet. Keep twisting and pulling until you reach about 2-3 inches from the bottom of the handle. When you're done use a couple of pins to secure it. I use a tiny white pin without pearl head so it can be hidden when I pin it in the ribbon. I aslo pin a few more pins along the handle to make sure the ribbon doesn't infold itself.

Now I just tie my tassles around the handle in a knot and I'm ready to go.

Here are a few pictures of the finish product.

Hope this inspire some of you to make your own bouquet. It's really a fun experience for me and I would do it over and over again. I spent around $24 for flowers, $15 for feathers and tassles and $5 for beads and floral tape. A total of $44 for my bouquet.

diy hanging crysals

DIY Hanging Crystals article photo

If I can do it, you can do it!! :)

MATERIALS

  1. Assorted crystal beads
  2. Soft Clear Illustrated Cord (fishing wire would work as well)
  3. Crimp Beads 1.3mm
  4. Flat Head Wire Crimp
DIRECTIONS:

Step One:
Cut Cord to your likings

Step Two:
Thread crimp bead to end of strand. This is where the bottom of the hanging crystal strand will start.


Step Three:
Thread beads

Step Four:
Leave about 3-4 inch gap before moving on to the next set of beads. REPEAT steps 2 and 3 until you get your desired length.

Step Five:
When you get to your desired length, thread one last crimp bead. Then thread through the same crimp bead again creating a loop.


Step Six:
Crimp it

and BAM! You've got yourself a pretty awesome hanging crystal :)

diy pocketfold using 8.5x11 paper

DIY Wedding Challenge: Pocketfold Invitation using 8.5X11 paper article photo Wiki
photo by: Hilary

Materials

  • 8.5 x 11 paper (80 – 100 lb weight is best for the pocketfolds, 60 lb is nice for the inserts but you can go thinner) Each invite will use one (1) sheet for the pocket fold and two (2) sheets for the inserts.
  • Ruler
  • Tacky paper glue and/or glue stick
  • Scissors
  • Paper trimmer Not necessary, but a nice to have instead of using scissors for everything, to make clean straight cuts
  • Paper scorer or bone folder Again, not necessary, but on thicker paper it helps keep the folds clean.

Extras

  • Ribbon To close off the invitation in a classy way
  • Corner puncher Make rounded corners on your invites
  • Heat embossing tools and materials (A stamp that you would like to emboss, pigment ink, embossing powder and an embossing heat tool)
  • Printer Instead of printing elsewhere, you can print from home with nice results
  • Design Program for your computer To help design your inserts; choices include Photoshop, Paintshop Pro, Gimp, Paint.net.
  • Embossing I used my Sizzix machine to emboss the paper (create a raised image, without using heat), which turns out lovely but it used a lot of extra paper and time.

I. Creating the Pocketfolds

Cut your paper as shown below (made to scale). Save your scraps, too, you will use them to make the second “edge” of the pocket.

Fold along the light dotted lines. Fold up the pocket and glue the edge. Take your spare edge, glue both sides, and use it on the other side of the pocket.

II. Creating the Inserts

I used two types of inserts; for most of my guests, I sent invitations that only had three inserts in them and directed them to RSVP online. A few received invitations that had RSVP card and envelopes in them.

The following are the measurements I used. A simple rule of thumb is to make the inserts just a little smaller than the pocket – so I made them a little less than 4 inches wide and just under 6.5 in tall. From there, I “guestimated” the heights so they would look pretty even and made sure to place the copy below the edge of the next insert.

I cut these out individually with my paper trimmer and allowed for some fluctuation in widths and heights because it will never be perfect. I also printed the inserts with “cheat guides” on the edges to help me cut quicker and faster.

A) Without a mail-in RSVP card

B) With a mail-in RSVP card

A tip for your RSVPs—the RSVP will need to be cut a little thinner so that it will fit in your envelope. These measurements are a guide, but you will need to cut even thinner than this to make them fit cleanly in the envelope. Use 4 BAR envelopes (3 5/8 x 5 1/8) for these.

After cutting your inserts, glue the main invitation piece in the middle of your pocketfold. I recommend a glue stick for the middle and light tacky paper glue around the edges for a secure look that's not bumpy from the glue.

III. Extras

Simple things like these can all add a nice elegant touch without going over budget.

  • Making rounded corners
  • Adding a ribbon around it, tying it off with a bow or a gold sticker or circle (for a flatter and cheaper alternative for postage reasons)
  • Coloring the edges of the inserts with stamp ink
  • Heat embossing and nice stamped image
  • Creating a map on the back of your directions card

A quick guide to Heat Embossing: You need pigment ink--this is because pigment ink stamp pads are slow drying. There are many methods to embossing, but for a quick and easy heat emboss, use your stamp with the pigment ink and after it's stamped on the paper, cover the stamped image in an embossing powder. You can get a cheap little canister at Jo-Ann's for $3.99.

Dump off the excess embossing powder. Often you'll find bits of powder sticking to the paper. A nice water color paint brush (you know, the cheap kind) will help you get rid of that. Then you use an embossing heat tool and wait until it melts and gets shiny and run it all along the stamp so it all gets shiny and melted. I picked my heat tool up at Jo-Ann for about $20.

Once it starts, it goes pretty quick; don't hover over it too long once it's melted because you'll start to warp the paper!

Tip: I tried the glue pads instead of a pigment ink and found that I got a lot of excess embossing powder on the paper with it. Black pigment ink occasionally showed through my gold embossing powder. The best solution was to get a gold pigment ink pad and use the gold embossing powder. That way if the embossing powder didn't completely cover the image, you couldn't tell at all because the ink itself was gold too!

IV. Final Thoughts

Here is my finished product; however, I changed the bows to just wrapping the ribbon around the whole thing and closing it off with a gold circle. Little did I know that envelopes can be too thick for regular postage!

With 80 lb paper for the pocketfolds and 60 lb paper for the inserts, I was just under the one ounce limit for regular postage; the mail-in RSVP invitations did require extra postage, but choosing different paper can make a difference.

diy

diy votive wraps

DIY Wedding Challenge: Damask Votive Holder Covers article photo Candles, Damask
photo by: soon2Bmrsjaramillo

Most "straight sided" votive holders are actually slightly tapered toward the base; this project will allow you to create a perfect fit for your glass votive holders!

Materials Needed:

  • clear glass votive holder ("straight" sided)
  • votive candle
  • pen or pencil
  • regular office paper
  • ruler or other straight edge
  • regular "clear" vellum paper
  • normal clear office tape
  • double sided tape
  • scissors
  • *option #1 = home computer with a scanner, inkjet printer, and MS Word or similar program
  • *option #2 = rubber stamp and ink pad

1) Take a normal sheet of 8.5"x11" office paper and either fold it or cut it in half along its width.

2) Wrap the 1/2 sheet of paper around the votive holder, hold in place with your hand.

3) With your other hand, use a pen or pencil to trace the top rim of the votive holder onto the paper. Hold the paper in place repeat the trace for the base of the holder.

4) Lay the paper flat and use a ruler or other straight edge to connect the outlines of the top and bottom traces.

5) Cut out the cover along the pen/pencil lines. Wrap the cutout around your votive cover and secure with normal clear office tape. You will notice that the seam runs at a funky angle up the holder (I darkened the edge so it is easier to see) - you can either leave the seam like this or straighten it with the next steps...

6) Slide the cover off of the holder leaving the taped seam intact.

7) Use a pair of scissors to cut the cover perpendicular to the top/bottom edges. This will be your new straight seam for the cover shape!

8) Lay the cover shape out flat. Notice that the top and bottom edges are slightly curved. It should look something like this:


*** at this point you can either use this shape as a template to trace onto pre-patterned papers, or use a rubber stamp and ink pad to add a design to some vellum.

*** or follow the next steps to digitize the template for use with digital graphics:


9) Before placing the cover shape onto the scanner, use a marker to darken the edges so the scanner will be sure to register the full shape. Scan the cover shape and save to your computer as an image (I use a JPEG format).

10) Open a new Microsoft Word document and insert the scanned image.

11) Use the drawing toolbar to trace the cover shape. I used the curve pen for the top and bottom edges and the straight pen for the side seams. Once the lines are drawn, you may want to increase the line width and change the line color so that it is easier to see.

12) Delete the scanned image. You should only have the drawn lines left. Select all the lines, right-click and choose "Group". This will make all the lines into one object.

13) Insert a image of your choice to be used as the cover design. This could be a pretty pattern, a monogram, or you can create a text box to make this into a votive place card or favor.

This example uses a damask JPEG that can be copied from the Project Wedding Guide article http://www.projectwedding.com/wiki/show/damask-files

If the image inserts on top of your cover shape, right-click the image and choose "Send to Back". You may need to move, resize, or crop your image.

14) Group your image and the cover shape. Now you can copy and paste the pair until your page is full. Test your print out on regular office paper to make sure your printer margins aren't cutting off any of your hard work. My printer margins allow me to create 3 covers per sheet of 8.5"x11" paper.

15) Load one sheet of clear vellum paper into your printer. Change your print settings to accommodate photo or glossy paper. This setting on an inkjet printer will lay down less ink so it doesn't smear. Use one sheet of vellum at a time to allow the ink to dry. Let each vellum sheet dry a few minutes before handling.

16) Use scissors to cut out the printed vellum covers along your drawn lines.

17) Affix the vellum cover to your glass votive holder using double-sided tape or similar adhesive.

18) Insert a votive or tea-light candle, light the candle, and VIOLA!